Fall Nail Art Trends: 4 Looks You Can DIY and One You Should Leave to the Pros
Fall is officially here and we’re finally ready to stop whining about the cold(er) weather and embrace it, because it’s no secret that when it comes to fashion and beauty trends, fall kind of slays. Take nail art, for example. It’s had its ups and downs, trend-wise, but nail art is back and subtler than ever.
We sat down with Essie’s Global Lead Educator, Rita Remark, to talk nail art trends for fall. And more importantly, we wanted to know how to recreate the looks at home. So we played a little game of “DIY or Do Not Try.” Watch the video above to see how to get five awesome nail art looks yourself!
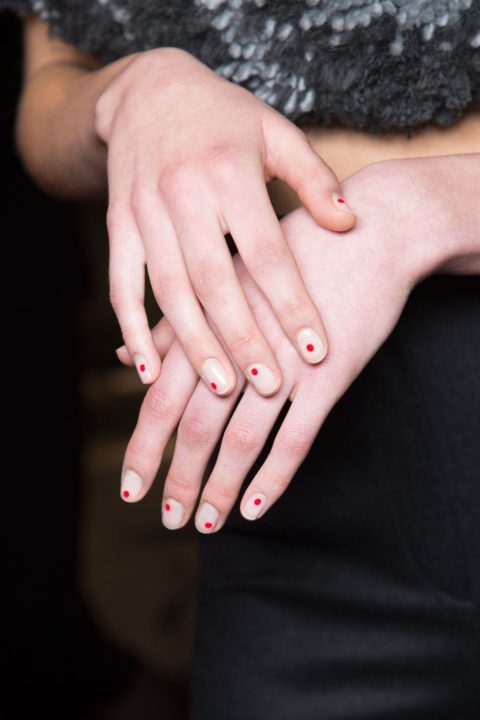
“Petit Dots”
Seen at Dorhout Mees and J. JS Lee
This fall trend is easy and minimalistic, but packs a punch depending on the colours you choose and the size of dots you create.
How-to:
1) Keeping the nail nude, apply one coat of base coat.
2) Using a dotting tool (or the end of a bobby pin), create one dot on each nail using essie “Kimono Over.” The key is to change the location of the dot on each nail to avoid a symmetrical look.
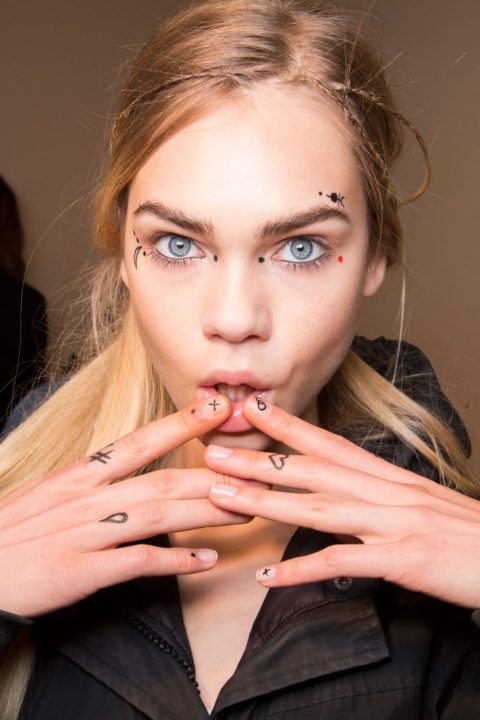
“Sketchy Doodles”
Seen at Giamba and Creatures of Comfort
This look is all about negative space, but with a bit more of a doodle-like look. While it’s not a lot of polish, it makes a big statement and really lets you get creative with the look to make it your own. Tip: If you don’t have a striping brush, head to the dollar store and buy a striping brush polish bottle, empty out the bottle and fill it with acetone. It’s a super handy tool for ultra precise nail art like this.
How to:
1) Using a dark high-contrast colour like essie “After School Boy Blazer,” dip the striping brush and begin by painting an ‘X’ on your middle finger. Following this, apply lines, dots, hashtags—any sketch that you love—to each nail. Symmetry is not important here, so you can change the location of the doodle on each nail and size can change between the nails, too! And keep some nails bare as well to keep variety in the look!
2) Finish the look with a top coat, like essie “Gel Setter.”

“Marble”
Seen at Helder Diego and Christian Siriano
This look is a really ornate, natural stone look on the nail, which could be a bit intimidating, so this might be one look to not try at home!
How to:
1) Apply one coat of essie “Stylenomics,” an ultra trendy dark hue for the fall season.
2) Without leaving time for drying, apply a few more drops of “Stylenomics” and “Tuck it in my Tux” and apply a square piece of cling wrap to the nail, pressing down lightly to swirl the colours together and quickly lift.
3) To add that stone-like finish, apply one coat of “Matte About You” top coat to give it that ‘from nature’ appearance.
4) Dip a striping brush in a metallic, like “Good As Gold” and polish thin wavy gold veins to give the stone an ornate finish.
“Halo”
Seen at Rodarte and Malorie Urbanovitch
This is a major fall look seen as a number of shows, and gives nails a gorgeous framed look, using a base colour and an inset coat in a different colour on top. You need to choose two colours with strong opacity and pigment so you only need to apply one coat of each shade.
How to:
1) Polish nails with one coat of essie “Maki me Happy,” making sure to get as close as possible to the sidewalls.
2) Use a dark hue like essie “Licorice” and apply over the base colour, leaving a tiny bit of space around the cuticle so the base coat colour frames the top colour.
3) Finish with a high shine top coat, like essie “Gel Setter.”
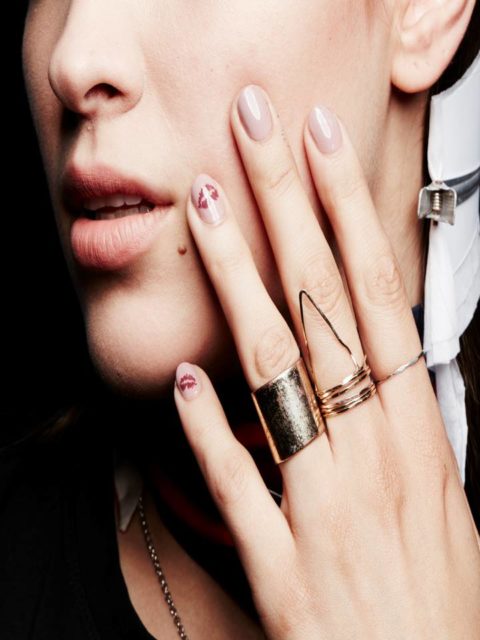
“Lip Print”
Seen at Rachel Antonoff and Hilary MacMillan
This is a fun nail look that’s a bit romantic and a bit sassy with the sultry kiss print, reminiscent of lips on a napkin.
How to:
1) Apply two coats of a pretty dusty rose, like essie “Go Go Geisha.”
2) To create the lip print, start by creating the cupids bow of the upper lip, polishing a ‘V’ with a striping or detail brush dipped in essie “Angora Cardi.” Next, finish the top lip by adding lines that taper, creating the outer corner of the mouth.
3) To create the bottom lip, start with a line and then taper it out towards the corner of the lips.
4) You can leave this look at one lip print, or add another. It’s really up to you!


 weather and embrace it, because it's no secret that when it comes to fashion and beauty trends, fall kind of slays. Take nail art, for example. It's had its ups and downs, trend-wise, but nail art is back and subtler than ever.
We sat down with Essie's Global Lead Educator, Rita Remark, to talk nail art trends for fall. And more importantly, we wanted to know how to recreate the looks at home. So we played a little game of "DIY or Do Not Try." Watch the video above to see how to get five awesome nail art looks yourself!
"Petit Dots"
Seen at Dorhout Mees and J. JS Lee
This fall trend is easy and minimalistic, but packs a punch depending on the colours you choose and the size of dots you create.
How-to:
1) Keeping the nail nude, apply one coat of base coat.
2) Using a dotting tool (or the end of a bobby pin), create one dot on each nail using essie "Kimono Over." The key is to change the location of the dot on each nail to avoid a symmetrical look.
"Sketchy Doodles"
Seen at Giamba and Creatures of Comfort
This look is all about negative space, but with a bit more of a doodle-like look. While it's not a lot of polish, it makes a big statement and really lets you get creative with the look to make it your own. Tip: If you don't have a striping brush, head to the dollar store and buy a striping brush polish bottle, empty out the bottle and fill it with acetone. It's a super handy tool for ultra precise nail art like this.
How to:
1) Using a dark high-contrast colour like essie "After School Boy Blazer," dip the striping brush and begin by painting an 'X' on your middle finger. Following this, apply lines, dots, hashtags---any sketch that you love---to each nail. Symmetry is not important here, so you can change the location of the doodle on each nail and size can change between the nails, too! And keep some nails bare as well to keep variety in the look!
2) Finish the look with a top coat, like essie "Gel Setter."
"Marble"
Seen at Helder Diego and Christian Siriano
This look is a really ornate, natural stone look on the nail, which could be a bit intimidating, so this might be one look to not try at home!
How to:
1) Apply one coat of essie "Stylenomics," an ultra trendy dark hue for the fall season.
2) Without leaving time for drying, apply a few more drops of "Stylenomics" and "Tuck it in my Tux" and apply a square piece of cling wrap to the nail, pressing down lightly to swirl the colours together and quickly lift.
3) To add that stone-like finish, apply one coat of "Matte About You" top coat to give it that 'from nature' appearance.
4) Dip a striping brush in a metallic, like "Good As Gold" and polish thin wavy gold veins to give the stone an ornate finish.
"Halo"
Seen at Rodarte and Malorie Urbanovitch
This is a major fall look seen as a number of shows, and gives nails a gorgeous framed look, using a base colour and an inset coat in a different colour on top. You need to choose two colours with strong opacity and pigment so you only need to apply one coat of each shade.
How to:
1) Polish nails with one coat of essie "Maki me Happy," making sure to get as close as possible to the sidewalls.
2) Use a dark hue like essie "Licorice" and apply over the base colour, leaving a tiny bit of space around the cuticle so the base coat colour frames the top colour.
3) Finish with a high shine top coat, like essie "Gel Setter."
"Lip Print"
Seen at Rachel Antonoff and Hilary MacMillan
This is a fun nail look that's a bit romantic and a bit sassy with the sultry kiss print, reminiscent of lips on a napkin.
How to:
1) Apply two coats of a pretty dusty rose, like essie "Go Go Geisha."
2) To create the lip print, start by creating the cupids bow of the upper lip, polishing a 'V' with a striping or detail brush dipped in essie "Angora Cardi." Next, finish the top lip by adding lines that taper, creating the outer corner of the mouth.
3) To create the bottom lip, start with a line and then taper it out towards the corner of the lips.
4) You can leave this look at one lip print, or add another. It's really up to you!)