
3 Holiday Nail Art Ideas That Are Way Easier Than They Look
As much as we love minimalist nail art, it doesn’t really broadcast holiday. So lazy girls, rejoice. Our Beauty Panel is here to solve your festive manicure woes. Because honestly, who really has the time and energy to spend on nails during a hectic party season? From an Elsa-worthy mani to a sweet candy cane design, here are three simple nail art ideas that will inject your fingers with holiday cheer.
Challenge 131: What’s the perfect winter nail art manicure for the lazy girl? See the answers below!»
Have a beauty question you want to see the panel answer? Send it our way at [email protected]. Read on for the answers to this week’s challenge and for more goodness, get to know all our contributors on our Beauty Panel hub page.
Stephanie Lau
Toronto | Fun Size Beauty
There’s no better way to spend a blustery day than being snuggled up in a blanket by the fire and doing your nails. It doesn’t have to be anything complex. My go-to winter nail art is a glitter gradient with a dark base and a holographic glitter. It’s festive for the holidays and takes only two polishes and a makeup sponge to do. You can start off with a peel off base coat so they’re easy to remove as well.
First, paint your nails with a deep, dark polish. Then, paint a small amount of glitter polish onto a makeup sponge. The makeup sponge will absorb the excess liquid from the polish, making the glitter easier to apply. Next, dab the glitter onto the nail, concentrating on the tips and patting sparsely as you approach the cuticles. Finally, add a top coat to smooth out the glitter and to add shine.
And voila! You’ve got fabulous and festive nails.
Products used: OPI Nail Lacquer in “Party at Holly’s”, OPI Nail Lacquer in “Sunrise…Bedtime!”, Seche Vite Fast Drying Top Coat and makeup sponges.
Colleen Conroy
Vancouver | Blush Rouge
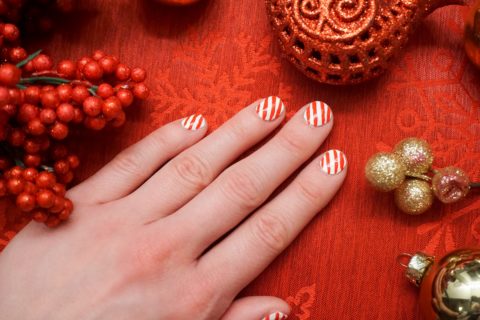
Being festive over the winter season is one of my absolute favourite things. Baking cookies, playing in the snow and integrating some holiday cheer into my beauty routine. A very simple way to show a little festivity is trying out this easy ‘candy cane’ nail art. It only takes a few steps and you’re left with adorable digits to show off.
First, prep your nails by filing, buffing and using a base coat. Next, do a couple of coats of white nail polish as your base colour. Once that is dry, use a fine-tipped paint brush dipped in red nail polish and start to draw thin diagonal lines across your nails. Finish off with a topcoat…and be careful not to confuse your nails as delicious candy canes.
Products used: Nail file, nail buffer, Revlon Multi Care Base + Top Coat, Sally Hansen Insta-Dri Nail Color in “Whirlwind White,” fine-tipped paint brush, Deborah Lippman Nail Polish in “It’s Raining Men”, Deborah Lippman Top Coat.
Shawna Friedberg
Toronto | Spill the Beauty
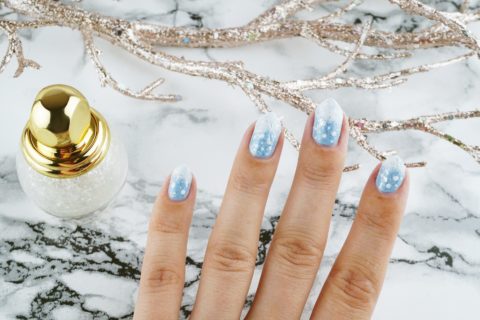
I love setting aside a chunk of time to do some intricate nail art, but it takes some serious effort and patience. If you’re looking for an easy and achievable nail art look, why not try rocking some snowy nails?
Start by painting a light blue base, using Essie in “Salt Water Happy”. Then paint some white nail polish (Sinful Colors in “Snow Me White”) onto a makeup sponge and dab it onto the tips of your nail. Taking that same white and using a small dotting tool, ad five to ten white dots overtop of the blue to look like snowflakes. For some extra sparkle, use Diorific Vernis in “Nova.” Seal everything using Essence’s The Gel Nail Polish Top Coat. And voila! You have a winter wonderland right at your fingertips.


 onto a makeup sponge and dab it onto the tips of your nail. Taking that same white and using a small dotting tool, ad five to ten white dots overtop of the blue to look like snowflakes. For some extra sparkle, use Diorific Vernis in "Nova." Seal everything using Essence's The Gel Nail Polish Top Coat. And voila! You have a winter wonderland right at your fingertips.
)