Our Beauty Panel shows off their favourite summer updos to beat the heat
Let’s face it, in the summer heat, no one has the patience for the flat iron or the curling wand. Hair on the back of your neck is basically hell on a humid day, but a ponytail can get boring really fast. So to solve our summer hair problems, we asked our Beauty Panel to show us their favourite DIY summer updo. Whether you’re looking for an easy ‘do to rock to an upcoming wedding, or you’re just looking to beat the heat, take a hint from our Beauty Panel’s updo suggestions.
Challenge 93: Show us your favourite summer updo. See the answers now! »
Have a beauty question you want to see the panel answer? Send it our way at [email protected]. Read on for the answers to this week’s challenge and for more goodness, get to know all contributors on our Beauty Panel hub page.
Jump to: COLLEEN CONROY | BRITTANY MESSNER |

Colleen Conroy
Montreal | Blush Rouge
I remember the time I discovered how to do a victory roll. I was planning on attending something called The Ice Cream Social, a rock and roll club that plays vinyl records from the 50’s and 60’s held at the Biltmore Cabaret in Vancouver. I had already picked out a cute polka dot dress that was perfect for twirling in. My makeup, of course, was all sorted with red lips and winged liner. But my hair was in need of some ideas. Coincidentally, the television show I was working on at the time was in the midst of filming a flashback sequence from the same era. I shared my plans with one of the wonderful hair ladies on the show and she kindly gave me a quick tutorial on the beautiful victory rolls they had been styling. After a few practice rounds, I had it. I found that instantly, this hairstyle made me feel completely put together. There is something about a vintage vibe that makes you feel all done up.
Start by parting your hair in the front. Then section out the two pieces that you will be using to roll back. I usually clip the remaining hair behind my head just to keep it out of the way during this part. I like to make sure that those two front pieces are backcombed, hair sprayed and smoothed out to make sure it really listens to me when I morph it into the roll. Next, lift the piece up fairly high and while keeping it taught start rolling it backwards. When it feels like it is in the shape you like, secure it with a few bobby pins. Do this to the other front piece, angling it a little straighter out so the roll is slightly lower. With the rest of your hair in the back you can either leave it all down, straight or curled, or you can pin it up to your liking.
Products used: Batiste XXL Volume Dry Shampoo, White Sands Infinity Hairspray, Goldilocks by Krest teasing comb #3 , Dannyco Bobby pins.
Brittany Messner
Calgary | Brittany Messner
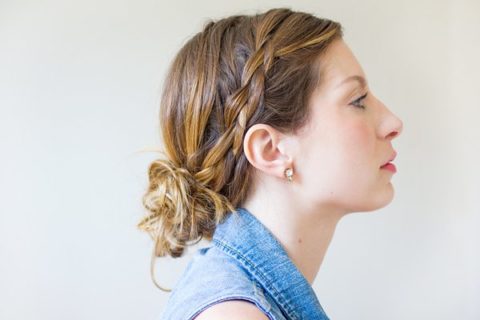
For this look I decided to incorporate a braided style into an everyday messy bun. After all, nothing says Summer like braids! What’s more is that when you’re strapped for time, a simple braid or two can instantly make your look appear a lot more complicated than it actually is.
To achieve this look simply take a (fairly big) section of hair and start braiding towards the back of your head. You can use whatever section you’d like, but since I often sport a heavy side-part I like to use this opportunity to secure the hair around my face so that it doesn’t bother me throughout the day. When you have reached the end of your braid you can loosen it up by slightly tugging on pieces here and there. Once you have achieved the desired effect, go ahead and secure all of your hair (including the braid) into a ponytail. You can create the messy bun by scrunching your hair together and looping around another elastic or simply using bobby pins to pin wherever you like.
What I love best about this look is that it looks effortlessly chic but still only takes five minutes to pull together. Not bad at all.


 section of hair and start braiding towards the back of your head. You can use whatever section you'd like, but since I often sport a heavy side-part I like to use this opportunity to secure the hair around my face so that it doesn't bother me throughout the day. When you have reached the end of your braid you can loosen it up by slightly tugging on pieces here and there. Once you have achieved the desired effect, go ahead and secure all of your hair (including the braid) into a ponytail. You can create the messy bun by scrunching your hair together and looping around another elastic or simply using bobby pins to pin wherever you like.
What I love best about this look is that it looks effortlessly chic but still only takes five minutes to pull together. Not bad at all.
)